
Visualizzazione post con etichetta sensor. Mostra tutti i post
Visualizzazione post con etichetta sensor. Mostra tutti i post
venerdì 26 marzo 2021
sabato 24 dicembre 2016
Simple Arduino Breathalyzer
Simple Arduino Breathalyzer

Introduction
The MQ series of gas sensors use a small heater inside with an electro-chemical sensor.
They can be calibrated more or less but a know concentration of the measured gas or gasses is needed for that.
They are sensitive for a range of gasses and are used indoors at room temperature.
The output is an analog signal and can be read with an analog input of the Arduino.
They can be calibrated more or less but a know concentration of the measured gas or gasses is needed for that.
They are sensitive for a range of gasses and are used indoors at room temperature.
The output is an analog signal and can be read with an analog input of the Arduino.
SainSmart MQ-3
The analog gas sensor - MQ3 is used in gas leakage detecting equipments in consumer and industry markets, this sensor is suitable for detecting LPG, i-butane, propane, methane ,alcohol, Hydrogen, smoke.
It has a high sensitivity and fast response time.And the sensitivity can be adjusted by the potentiometer.
The MQ-3 is an alcohol gas sensor that is available for about $5.
Connetting
Sensor-Arduino
GND - GND
A0 - A0
VCC - 5V
Arduino Schetch
Test Code:
int val=0;
void setup(){
Serial.begin(9600);
}
void loop(){
val=analogRead(A0);
Serial.println(val);
delay(100);
}
Link App
https://drive.google.com/file/d/1naIS3WD_Boty_EjX_9em6Vw1NMy59dps/view?usp=sharing

mercoledì 15 giugno 2016
How to use MQ7 gas sensors whith Arduino+Android App
In this project show you, how receive MQ7 data from arduino with your
android phone. Carbon monoxide(CO) is a very dengerous gas which is
odorless, colorless. CO is produced from the partial oxidation of
carbon dioxide, such as when operrating a stove or an internal
combustion engine in an enclosed space.
RX (Pin 0)----------------------------------------TX
TX (Pin 1)-----------------------------------------RX
5v---------------------------------------------------5v
Gnd-------------------------------------------------Gnd
Pin2,Gnd------------------------------------------Gnd
Arduino Pins: -------------------------- MQ-7(CO Sensor):
Vcc ------------------------------------------- 5V pin
GND ------------------------------------------ GND pin
A_Out ----------------------------------------- A0 pin
D_Out ----------------------------------------- pin 8.
HC-06 Bluetooth
Notes and Tips: You need to remove the RX and TX cables when you’re uploading the sketch to your Arduino. If the HC-06 Bluetooth Module asks for a password, It’s’1234′. Sometimes people connect the TX from the bluetooth module to the TX of the Arduino… that’s wrong and it won’t work. Make sure you connect it properly, the TX into RX and the RX into the TX.
Step 1:Components Needed
Hardware
- Bluetooth
- ModuleMQ7-Sensor
- Breadboard
- Arduino Uno
- Jumper Wire
- Arduino IDE
- App Inventor 2 (for create your app).
Step 2: Watch the video tutorial
The circuit is so simple:
Arduino Pins: -------------------------- Bluetooth Module:RX (Pin 0)----------------------------------------TX
TX (Pin 1)-----------------------------------------RX
5v---------------------------------------------------5v
Gnd-------------------------------------------------Gnd
Pin2,Gnd------------------------------------------Gnd
Arduino Pins: -------------------------- MQ-7(CO Sensor):
Vcc ------------------------------------------- 5V pin
GND ------------------------------------------ GND pin
A_Out ----------------------------------------- A0 pin
D_Out ----------------------------------------- pin 8.
HC-06 Bluetooth
Notes and Tips: You need to remove the RX and TX cables when you’re uploading the sketch to your Arduino. If the HC-06 Bluetooth Module asks for a password, It’s’1234′. Sometimes people connect the TX from the bluetooth module to the TX of the Arduino… that’s wrong and it won’t work. Make sure you connect it properly, the TX into RX and the RX into the TX.
Step 4: Arduino Sketch
const int AOUTpin=0;//the AOUT pin of the CO sensor goes into analog pin A0 of the arduino
const int DOUTpin=8;//the DOUT pin of the CO sensor goes into digital pin D8 of the arduino const int ledPin=13;//the anode of the LED connects to digital pin D13 of the arduino
int limit; int value;
void setup() { Serial.begin(9600);//sets the baud rate pinMode(DOUTpin, INPUT);//sets the pin as an input to the arduino pinMode(ledPin, OUTPUT);//sets the pin as an output of the arduino }
void loop() { value= analogRead(AOUTpin);//reads the analaog value from the CO sensor's AOUT pin limit= digitalRead(DOUTpin);//reads the digital value from the CO sensor's DOUT pin Serial.print("CO value: "); Serial.println(value);//prints the CO value Serial.print("Limit: "); Serial.print(limit);//prints the limit reached as either LOW or HIGH (above or underneath) delay(100); if (limit == HIGH){ Serial.println("Bad"); } else{ Serial.println("OK"); } }
const int DOUTpin=8;//the DOUT pin of the CO sensor goes into digital pin D8 of the arduino const int ledPin=13;//the anode of the LED connects to digital pin D13 of the arduino
int limit; int value;
void setup() { Serial.begin(9600);//sets the baud rate pinMode(DOUTpin, INPUT);//sets the pin as an input to the arduino pinMode(ledPin, OUTPUT);//sets the pin as an output of the arduino }
void loop() { value= analogRead(AOUTpin);//reads the analaog value from the CO sensor's AOUT pin limit= digitalRead(DOUTpin);//reads the digital value from the CO sensor's DOUT pin Serial.print("CO value: "); Serial.println(value);//prints the CO value Serial.print("Limit: "); Serial.print(limit);//prints the limit reached as either LOW or HIGH (above or underneath) delay(100); if (limit == HIGH){ Serial.println("Bad"); } else{ Serial.println("OK"); } }
martedì 14 ottobre 2014
Dht11 Temperature and Humidity Sensor
The DHT11 is a basic, low-cost digital temperature and humidity sensor.
Its fairly simple to use, but requires careful timing to grab data.
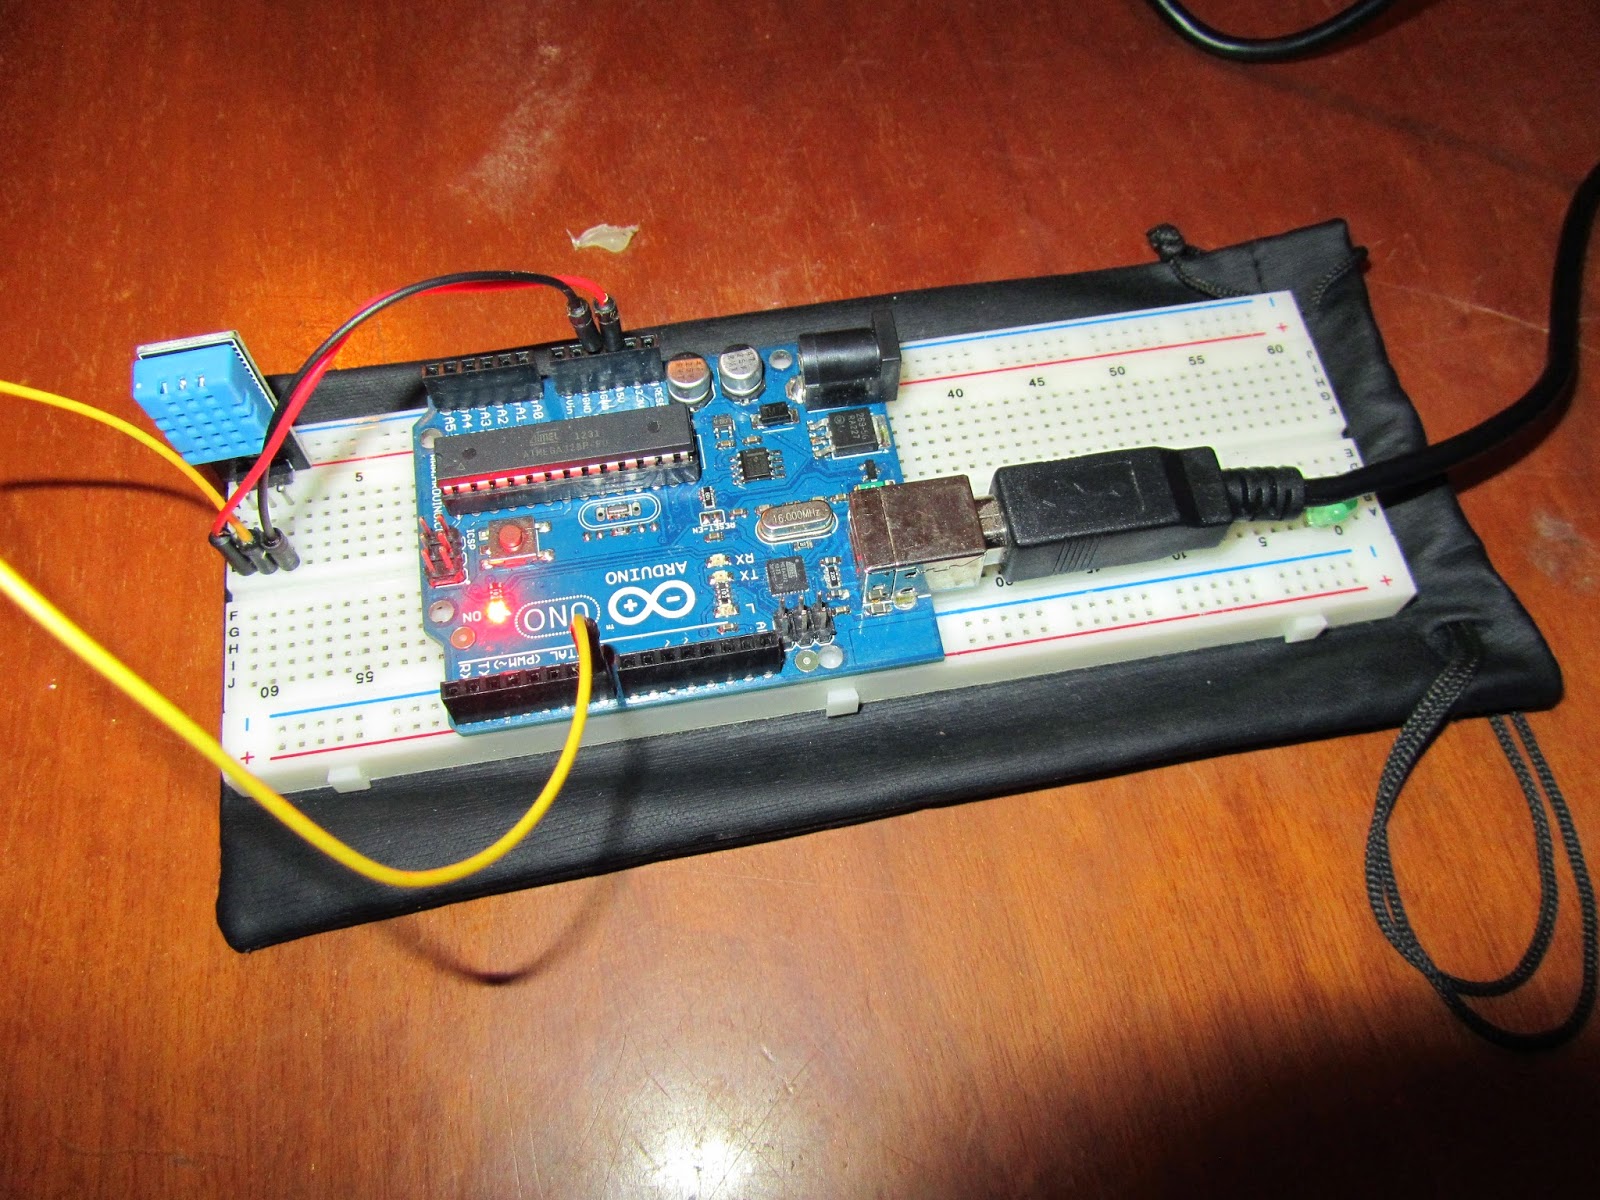
Technical Details
Low Cost
3 to 5V power and I/O
2.5mA max current
Good for 20-80% humidity readings with 5% accuracy
Good for 0-50°C temperature readings ±2°C accuracy
No more than 1 Hz sampling rate (once every second)
Body size 15.5mm x 12mm x 5.5mm
Test sketch
//
// FILE: dht11_test1.pde
// PURPOSE: DHT11 library test sketch for Arduino
//
#include <dht11.h>
dht11 DHT;
#define DHT11_PIN 7
void setup(){
Serial.begin(9600);
Serial.println("DHT TEST PROGRAM ");
Serial.print("LIBRARY VERSION: ");
Serial.println(DHT11LIB_VERSION);
Serial.println();
Serial.println("Type,\tstatus,\tHumidity (%),\tTemperature (C)");
}
void loop(){
int chk;
Serial.print("DHT11, \t");
chk = DHT.read(DHT11_PIN); // READ DATA
switch (chk){
case DHTLIB_OK:
Serial.print("OK,\t");
break;
case DHTLIB_ERROR_CHECKSUM:
Serial.print("Checksum error,\t");
break;
case DHTLIB_ERROR_TIMEOUT:
Serial.print("Time out error,\t");
break;
default:
Serial.print("Unknown error,\t");
break;
}
// DISPLAT DATA
Serial.print(DHT.humidity,1);
Serial.print(",\t");
Serial.println(DHT.temperature,1);
delay(1000);
}
A tutorial on how to connect a DHT11 Sensor to your Arduino
Its fairly simple to use, but requires careful timing to grab data.
Technical Details
Low Cost
3 to 5V power and I/O
2.5mA max current
Good for 20-80% humidity readings with 5% accuracy
Good for 0-50°C temperature readings ±2°C accuracy
No more than 1 Hz sampling rate (once every second)
Body size 15.5mm x 12mm x 5.5mm
Test sketch
//
// FILE: dht11_test1.pde
// PURPOSE: DHT11 library test sketch for Arduino
//
#include <dht11.h>
dht11 DHT;
#define DHT11_PIN 7
void setup(){
Serial.begin(9600);
Serial.println("DHT TEST PROGRAM ");
Serial.print("LIBRARY VERSION: ");
Serial.println(DHT11LIB_VERSION);
Serial.println();
Serial.println("Type,\tstatus,\tHumidity (%),\tTemperature (C)");
}
void loop(){
int chk;
Serial.print("DHT11, \t");
chk = DHT.read(DHT11_PIN); // READ DATA
switch (chk){
case DHTLIB_OK:
Serial.print("OK,\t");
break;
case DHTLIB_ERROR_CHECKSUM:
Serial.print("Checksum error,\t");
break;
case DHTLIB_ERROR_TIMEOUT:
Serial.print("Time out error,\t");
break;
default:
Serial.print("Unknown error,\t");
break;
}
// DISPLAT DATA
Serial.print(DHT.humidity,1);
Serial.print(",\t");
Serial.println(DHT.temperature,1);
delay(1000);
}
A tutorial on how to connect a DHT11 Sensor to your Arduino
Iscriviti a:
Post (Atom)
-
Arduino Tutorial In this tutorial I'll show you How to control Arduino with Bluetooth using, My app developed with app inventor. ...
-
Ecco il link per il materiale delle lezioni : https://t.me/CorsoIOTDaVinci
-
 In this video, I'll given a simple demo of the alarm I built using Arduino UNO interfaced with DHT11 Temperature sensor and a Buzzer.
